Pork chops have never been my favorite food. It is the meat that I would make out of duty since I felt it necessary to rotate some pork into our diet with our chicken, fish and beef. It also was the meat that would often end up being thrown away when leftover after sitting in the fridge for a few days. I don't have any qualms about where on the pig the chops come from nor do I worry that pigs are not technically "clean" animals, which, to some, may deem them non-kosher. I personally would usually just rather have chicken or fish instead of "the other white meat."
However, two pork chop recipes do remain my favorites and have redeemed the entire pork chop species in my mind :). They are simple family recipes that are easy to prepare, can be done a few hours in advance (aka when the children are napping or at school) and produce moist, tender results. Both are great if paired with plain buttered egg noodles, a veggie and applesauce. Enjoy!
Nana's Baked Pork Chops
4-6 1/2" pork chops, either bone-in or boneless
flour
bread crumbs
2 eggs, beaten
3/4c. milk
vegetable oil
Place 2-4T vegetable oil over med-hi heat into a skillet or Corning Ware, preferably one that can be placed directly into the oven. Put the flour and bread crumbs into separate shallow plates/bowls. Dip the chops into flour, then egg, then bread crumbs. Coat evenly and place into the skillet. Pan fry until browned, adding more oil if needed. Remove meat to a plate. Add the milk to the same skillet, scraping up all of the brown bits. Cook until boiling and then remove from the heat. Either add the chops back to the pan if it can go right into the oven or pour the milk mixture over the chops in another oven-safe dish. Turn chops to fully coat in the milk mixture. **This will appear really strange, almost unappetizing, but the milk will help to make the chops tender while keeping the coating crispy and bubbly.** Place into a preheated 350 degree oven for 45 minutes to 1 hour; closer to 1 hour for bone-in chops and closer to 45 minutes for boneless. Enjoy!
German-Style Pork Chops
4-6 1/2" pork chops, either bone-in or boneless
1 can sauerkraut
1/2 pound bacon
2T. brown sugar
PAM cooking spray
Preheat oven to 350. Spray a Corning Ware or oven-safe dish with PAM. Pan fry the bacon in a skillet and set aside to cool. Drain excess grease. In the same skillet using the light coating of oil from cooking the bacon, brown the pork chops; they will be raw in the middle. Place in the dish. Meanwhile, add the sauerkraut to the same skillet and saute. Break the bacon into pieces, Add the brown sugar and bacon to the skillet and continue to saute until golden and coated. Pour this mixture on top of the pork chops. Bake for 30 minutes, covered. remove cover and bake for 15 more minutes. Enjoy!
Showing posts with label Recipes. Show all posts
Showing posts with label Recipes. Show all posts
Friday, February 11, 2011
Friday, December 17, 2010
Christmas Cutout Cookies

Like many Christian families, we enjoy making Christmas cookies and candies in preparation for the holiday. We have a fun time making them together and also packaging them up to give out to friends and family. I will have a few additional posts this season with some other recipes and ideas, but this one is specifically for my friend Jessica, who requested that I put this up on my blog. I believe I first made her these cutout cookie sandwiches for her office baby shower many years ago (seven??). Yes, I do make these for other occasions in different shapes, but for the most part I make them at Christmastime. I also sometimes do not make them into sandwiches and just keep them as plain cutout cookies. I have another butter cookies recipe I do make at times, too, which is harder in texture, but these ones are one of my favorites because they are such a soft cookie that retains its shape for ease in cutting and baking. Enjoy!
1c. butter
3oz. cream cheese
3/4c. sugar
1tsp. vanilla
1 egg
3c. flour
1/8tsp. salt
About 1c. lemon curd, seedless raspberry jam or apricot jam
powdered sugar
Beat butter, cream cheese, sugar, vanilla and egg in large bowl with an mixer on medium speed until light and fluffy. Stir in flour and salt until blended. Cover and refrigerate for 2-6 hours. Heat oven to 375. Roll a fourth of the dough at a time to 1/8" thickness on a lightly floured board. Cut dough with cutters and place 1 inch apart on an ungreased cookie sheet. Bake for 8-10 minutes, until very light brow and set Immediately remove from cookie sheet to cooling rack. When cool, make cookies into sandwiches by putting 1/2tsp. jam or curd on the bottom cookie and covering with another. Mix approximately 2c. powdered sugar with 1/4c. water. You may add a dash of almond or vanilla extract, if desired. Fill a pastry bag or a Ziploc with the corner snipped with the icing. The consistency should be stiff enough to not spread out when a line is drawn but thin enough to be able to easily write. You may also opt to just spread icing on the cookies instead of outlining and using the writing tip to decorate. In either case, sprinkle with colored sugars very quickly after the icing is put onto the cookie and shake off the excess. Let dry completely and enjoy!
Friday, December 10, 2010
Family Movie Night: A Charlie Brown Christmas

Menu: Hot chocolate and Cheerio Christmas Trees
Tonight our family will get our Christmas tree together so what better way to end our evening than to have a Family Movie Night starring Charlie Brown, Lucy and the gang. Our boys just love Charlie Brown and I have recently coerced them into not watching It's the Great Pumpkin, Charlie Brown every other day. So, I believe it's time for a holiday shift starring our favorite blockhead and Joe Cool.
 So that Charlie is not the only one with his infamously, eh, interesting "Charlie Brown tree," we opted to make 8 of them ourselves this morning to enjoy as our special treat. So, ta-da, eight little Charlie Brown Christmas trees, made with Cheerios, marshmallows and lots of love. We had loads of fun with the green food coloring and we had to do a little reshaping of our trees everytime a candy ornament was placed on one of them (with a little too much pressure), but they survived and are now all decked out for the big occasion tonight.
To make these yourself:
3 cups Cheerios
3T. butter
Approximately 2.5 cups of large or mini marshmallows
Green food coloring
Assorted small candies
Over low heat, melt the butter and marshmallows until creamy and completely smooth. Place the Cheerios into a large bowl. Pour the melted marshmallow mixture over the Cheerios and stir. Add green food coloring to your liking. Spray hands with PAM and gently shape approximately 1/4 cup of the mixture into a Christmas tree shape and place on waxed paper. Decorate with candies by pressing into the trees gently. Enjoy!
We really enjoy Rice Krispie treats in our house but ever since receiving the Cheerios cookbook, we have often opted towards using Cheerios in lieu of the Krispies. You can basically use them interchangeably. I would highly recommend the Cheerios cookbook for any family with young children. It has easy recipes that the kids can help prepare and some cute craft ideas, too. A really cute birthday or new baby gift, especially if coupled with the Cheerios play books. All are available at Amazon and links are below.
Good grief, Snoopy, that was easy enough, now wasn't it? Here's to a happy and healthy Christmas season to you and your family. May you and your family have as much fun watching Charlie Brown as I know we always do every year. And as Linus likes to remind us in the Christmas pagent at the end of the movie,
"And there were in the same country shepherds abiding in the field, keeping watch over their flock by night. And, lo, the angel of the Lord came upon them, and the glory of the Lord shone round about them: and they were sore afraid. And the angel said unto them, Fear not: for, behold, I bring you tidings of great joy, which shall be to all people. For unto you is born this day in the city of David a Savior, which is Christ the Lord. And this shall be a sign unto you; Ye shall find the babe wrapped in swaddling clothes, lying in a manger. And suddenly there was with the angel a multitude of the heavenly host praising God, and saying, Glory to God in the highest, and on earth peace and goodwill towards men.'"
"......That's what Christmas is all about, Charlie Brown."
Quick and Easy Peppermint Treats
Christmas is quickly approaching and many of you are probably thinking about doing some Christmas baking for your various family and friend gatherings. If, like me, you enjoy making elegant looking treats that are both delicious and easy to prepare, then the following list of peppermint-themed treats may be appealing to you. You can enjoy these yummy Christmas treats that you can make either alone or with the kids. With a minimal amount of baking, if any, they are easy for everyone to help out.
 Oreo Peppermint Truffles
8oz. Cream cheese, softened
1lb. Box of Oreo cookies, or equivalent
1/4c. Finely crushed candy canes
2c. Dark, semi-sweet or white chocolate, melted
1/4c. Finely crushed candy canes
2c. Dark, semi-sweet or white chocolate, melted
Mix cream cheese, candy canes and about 3/4 of the Oreo crumbs well. Shape into approximately 48 balls and place in the freezer until very firm, at least an hour. Dip in melted chocolate, sprinkle with extra cookie crumbs or peppermint pieces. Place on waxed paper sheets. Refrigerate 1 hour until firm.
Peppermint Bark
 12oz. Dark chocolate chips
12oz. White chocolate chips
1 box candy canes, coarsely chopped
Line a 10x7 baking dish with wax paper, wrapping around the top and taping to the edges to hold in place. Melt the dark chocolate in the microwave or with a double boiler. Spread evenly in the pan. Place in the refrigerator for 15 minutes. Next, melt the white chocolate and spread on top of the dark chocolate. While still wet, sprinkle the top with the chopped candy canes. Refrigerate until firm and break into “bark-like” pieces.
 Peppermint Meringues
2 egg whites
1/8 teaspoon salt
1/8 teaspoon cream of tartar
1/2 cup white sugar
2 peppermint candy canes, crushed
Preheat oven to 225 degrees F. Line two cookie sheets with foil. In a large mixing bowl, beat egg whites, salt, and cream of tartar to soft peaks. Gradually add sugar, continuing to beat until shiny with stiff peaks. Drop by spoonfuls 1 inch apart on the prepared cookie sheets. Sprinkle crushed peppermint candy over the cookies. Bake for 1-1/2 hours. Meringues should be completely dry on the inside. Do not allow them to brown. Turn off oven. Keep oven door ajar, and let meringues sit in the oven until completely cool. Loosen from foil with metal spatula.
 Peppermint Chocolate Spoons
40 plastic spoons of your choice in color
12 oz. dark chocolate candy melts
1/2c. Finely chopped candy canes
Melt chocolate wafers in the microwave or with a double boiler. Spread a piece of wax paper out on your counter or table. Dip the spoons into the chocolate to thoroughly coat, going a few inches up the handle. Sprinkle with candy cane pieces and place on the waxed paper to dry. Wrap up as a gift by tying several together with a ribbon and placing into a bag. These are delicious when used to stir your coffee or hot chocolate.
Friday, October 8, 2010
Make-Your-Own Pizza Night
We love pizza at our house and that love is amplified in my mind by the fact that my kids will all eat pizza without the word "yucky" ever leaving their mouths. So, that's a definite plus to me! In fact, be it pizza of the restaurant, take-out, frozen, or homemade variety, it makes no difference. There are always smiles and squeals of delight when I announce that we'll be eating it.
When I knew I'd be heading out the door for a committment soon after dinnertime tonight, I knew I had to make something fast and easy, that I could easily put together with the kids around. So, the idea of having a Make-Your-Own Pizza Night popped into my head. What could be more fun than getting to eat pizza for dinner? Getting to assemble it, of course! I always love something that doubles as something useful (dinner) and something fun (afternoon craft).
Our pizza night started with good 'ole Mr. Breadman. Some people have mixed thoughts on bread machines, especially compared to traditional homemade bread, but we love it. The breads we have tried have been moist and yummy and the best part about the Breadman is that it frees my hands up to do other tasks, which is always a bonus in my book.
So, enter Breadman pizza dough recipe. We use all-purpose white flour or semolina flour, but you can certainly use whole wheat flour if you'd prefer.
Pizza Dough (for two 12" pies)
1-1/2c. warm water
2T. olive oil
2tsp kosher salt
4-1/4c. flour
2tsp. sugar
2tsp. yeast
Set the machine to the Dough cycle. Add ingredients in order listed, or in the order in which your bread machine tells you to add ingredients. When it is finished, place in a bowl brushed with olive oil and brush the top of the dough with olive oil, too, before covering with plastic wrap. Refrigerate until ready to use.
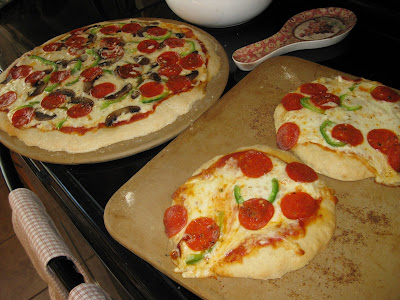
 When ready to use, knead lightly and divide into two pieces. With lightly floured hands, spread the dough on an oil brushed pizza stone, sprinkled lightly with cornmeal. Spread dough to within 1/4" of the end of the round stone. Or, we actually opted for two personal pizzas in lieu of one larger pizza with one half of our dough. This seemed like the best option for two little boys who each wanted to put toppings on their own personal pizza. Bake crust for 20 minutes at 375.

 Remove crust, brush with olive oil, add toppings and cook for an additional 25 minutes, until lightly browned and the toppings are bubbly.

 Voila, time for the oven. Looks yummy, doesn't it?


When I knew I'd be heading out the door for a committment soon after dinnertime tonight, I knew I had to make something fast and easy, that I could easily put together with the kids around. So, the idea of having a Make-Your-Own Pizza Night popped into my head. What could be more fun than getting to eat pizza for dinner? Getting to assemble it, of course! I always love something that doubles as something useful (dinner) and something fun (afternoon craft).
Our pizza night started with good 'ole Mr. Breadman. Some people have mixed thoughts on bread machines, especially compared to traditional homemade bread, but we love it. The breads we have tried have been moist and yummy and the best part about the Breadman is that it frees my hands up to do other tasks, which is always a bonus in my book.
So, enter Breadman pizza dough recipe. We use all-purpose white flour or semolina flour, but you can certainly use whole wheat flour if you'd prefer.
Pizza Dough (for two 12" pies)
1-1/2c. warm water
2T. olive oil
2tsp kosher salt
4-1/4c. flour
2tsp. sugar
2tsp. yeast
Set the machine to the Dough cycle. Add ingredients in order listed, or in the order in which your bread machine tells you to add ingredients. When it is finished, place in a bowl brushed with olive oil and brush the top of the dough with olive oil, too, before covering with plastic wrap. Refrigerate until ready to use.


And to the table we go! Dinner is served and it looks just as yummy as Pizza Mia at the end of your road, doesn't it? (Disregard the excess cheese oozing off the side of the personal pizzas. Apparently, the kids had a little too much fun adding cheese to their pies. Now...mangia!

Wednesday, October 6, 2010
My Favorite Chicken Marsala
My husband and I just love a good Chicken Marsala. In fact, I'd be so daring as to say that this could be both of our favorite food. Well, at least it's mine and for my husband, it comes as close to a favorite as something that's not beef possibly could.

The secret to a good Chicken Marsala is...(drumroll)...the Marsala wine. I didn't say that this was going to be rocket science! Seriously, the most important ingredient is the Marsala wine so if you are serving it for a special occasion or for company, I'd splurge on a bottle of Marsala wine for your cooking. For other times, cooking Marsala wine (found in the supermarket) works fine and is, in fact, what I usually use when we have this for a weeknight meal. Just note that cooking wines are high in sodium so you may want to cut the additional salt that is added, until after you have taste-tested it. You could always add more.
I have tried many Chicken Marsalas and this one is our favorite because it is flavorful and light; there is no flour in the sauce so it won't get clumpy. It really enables you to taste the chicken, mushrooms and the sauce without hiding the flavors in extra flour. It's delicious served atop some wide egg noodles, some angel hair or other pasta or with rice. We go heavy on the mushrooms since we love them, but you can reduce those as well. Enjoy!
Chicken Marsala
3 large chicken breasts, cut in half to form 6 pieces
1-1/2T olive oil
3-1/2T butter
1/2c. flour seasoned with salt and pepper
1 onion, sliced very thin
1lb. mushrooms, sliced thin
1c. Marsala wine
1c. chicken broth
1T. lemon juice
2T. freshly chopped parsley (or 1tsp. dried parsley)
Combine flour with salt and pepper to taste. Pat chicken dry, place between two pieces of wax paper and pound with a meat mallet. Cover in flour mixture. Heat 1-1/2T butter and oil in skillet. Add chicken, turning once until cooked through and lightly browned. Transfer chicken to a platter. Saute onions and mushrooms. Add Marsala and cook until almost evaporated. Add chicken broth and lemon juice.
Simmer sauce until liquid is reduced to about 1C. Remove skillet from heat and add remaining 2T butter and any additional salt and pepper (to taste). Spoon sauce over chicken and garnish with parsley.
Happy cooking!

Saturday, October 2, 2010
Chicken Cacciatore
This is what the Martin family ate for dinner tonight and it's one of our favorites so I thought I'd share it. I just love zucchini; I find it so flavorful and good thing since we had about 200 of them in our garden this past summer. So, we enjoyed them all summer long and I have many of them blanched and frozen as well, for when it is cold and snowy outside and we just feel like a little taste of summer again.

Now this recipe is a Scarcella specialty from my mom, which means that there were hardly any measurements involved since we all know that Italian moms know how to cook and do it well, even without measuring. I have had great success adding my own portions of spices whenever I make this so do a little experimenting with flavor as you cook and add more spice where it's needed. However, so as not to stress anyone out who relies heavily on their little set of measuring spoons, I have estimated amounts for the recipe. So go ahead and give this delicious meal a try. It's fast, easy and a great week night idea that can be on the table within 30 minutes. It's also a great dish to bring to a friend who is ill or has just had a baby. Buon appetito!
Chicken Cacciatore
1 lb. boneless, skinless chicken breasts -OR- assorted chicken parts on the bone
1/2c. flour
1/2tsp. salt
1/4tsp. pepper
1/2tsp. garlic powder
2T. olive oil
2-3 small zucchninis, sliced 1/4" thick
1 large onion, sliced
1 can diced tomatoes
1tsp. Italian seasoning
1 clove minced fresh garlic
Combine flour, pepper, salt and garlic powder on a piece of wax paper. Wash chicken and slice boneless breasts in half, if you are using those. Heat olive oil over med-hi heat in large skillet. Coat chicken pieces in the flour mixture and place in skillet. Brown chicken pieces on all sides and remove to a plate. Add zucchini and onion to the skillet and saute until tender. You may add a little extra olive oil to the skillet, if needed. Once tender, add the tomatoes, Italian seasoning and garlic to the skillet. Saute for several minutes, adding a little extra salt, pepper and garlic powder, if desired. Add chicken back to the skillet, cover with vegetables and turn to lo-med heat to simmer steadily. Cover your skillet and let simmer for about 20-30 minutes for boneless breasts or 30-45 minutes for bone-in chicken parts. Serve over pasta, rice or couscous. Enjoy!
Thursday, September 23, 2010
Fondue...at Home!
 My husband and I are big fans of The Melting Pot. Well, not big, actually, huge. Yeah, that sums it up a little better. We just love that place for its three courses of fondue, primarily, but also for the slow, leisurely environment that a fondue dinner entails. The very nature of fondue just takes longer than a traditional restrauant, since you are basically only cooking bite-size portions of your meal at one time. And in today's world of rush, rush, rush, it is so nice to not be in and out of a restaurant in an hour, especially if you are out for a special occasion or on a much-anticipated date night. (What? A leisurely dinner without kids? Is this possible?)
If you have never been to a Melting Pot, book your visit there for your next special evening out. It will be guaranteed to please! The Melting Pot
However, maybe you are like we are and going out on special occasions isn't always a possibility, both budget-wise and also because you have little ones at home to make arrangements for every time you want to go out, which not only adds additional aggravation to the planning, but additional expense as well. If so, then why not take the Melting Pot to you for those special occasions? Put the kids to bed, get dressed up, light some candles and voila - an impromptu fondue experience at home without the additional stress of reservations, babysitters and high bills.
Here is my recipe for a fun fondue evening at home. My husband and I have done the full experience for an at-home date night many times and I have also done the appetizer and dessert courses only with some friends for a Ladies Night Out. Remember, that for each course, there are always substitutions you can make youself; I have merely included items that I know The Melting Pot uses in their courses, purely for a more authentic experience of bringing The Melting Pot to your home. Bon Appetit!
First, you will need a fondue pot and if you plan to do the entree course and the appetizer course, then an electric fondue pot is a must. The traditional candle ones will keep food hot, but will not cook it. I highly recommend Rival's Fondue Pot. It has brought us many years of fondue without problem and is reasonably priced.
Advance Preparation
The day you will be having your fondue gathering, you will need to prepare all of the courses in advance. This entails cutting the food into bite-size pieces and displaying on a platter and also making the dipping sauces. Note that you will need to wash the fondue pot out between the 3 courses if you only have one of them (which I do). This only takes a few minutes, so pour yourself a nice glass of wine and spend less than 5 minutes washing out the pot without complaining :).
Cheese fondue preparation:
Place on a platter: baby carrots, cubed French bread, cubed apple chunks, and celery pieces.
Pre-measure all ingredients for the cheese fondue for an easier time making it later on during your event.
Entree fondue preparation:
Place in a divided platter: cubed uncooked chicken chunks, cubed filet mignon, cubed marinated steak, raw shrimp with the tail removed, cubed raw salmon.
Place on another platter: Sliced, raw potatoes; raw broccoli; raw whole mushrooms
Dipping sauces:
Teriyaki sauce (bottled)
Barbeque sauce (bottled)
Hoisin plum sauce (bottled)
Cocktail sauce (mix 3 parts ketchup to 1 part horseradish; add more horseradish if desired)
The Melting Pot's Green Goddess Sauce (recipe below)
Green Goddess Sauce (compliments of The Melting Pot)
8 ounces cream cheese, cut into slices
1/2 cup milk 1/4 cup sour cream
2 tablespoons finely chopped onion
2 tablespoons finely chopped parsley
2 tablespoons finely sliced chives
Dessert fondue preparation
Place on a platter: marshmallows, hulled strawberries, sliced bananas, cut up homemade or bakery brownie, sliced bakery cheesecake
Pre-measure all dessert fondue ingredients for an easier time making it later on during your event.
Pre-measure all dessert fondue ingredients for an easier time making it later on during your event.
Course 1: Cheese Fondue
Swiss Cheese Fondue
16 oz. shredded Swiss
-or-
8 oz. shredded Gruyere and 8 oz. shredded Emmanthaler
1/2 cup dry white wine
1T. flour mixed with 1T water
1/2 tsp. nutmeg
Heat wine in fondue pot over med-hi heat. Add cheese and stir until melted. Add flour mixture to stabilize consistency. Sprinkle in nutmeg.
Cheddar Cheese Fondue
16 oz. shredded Cheddar
1c. hard cider or beer
1T. flour mixed with 1T water
1tsp. minced garlic
Garlic powder
Heat cider or beer over med-hi heat. Add garlic until fragrant. Add cheese and stir until melted. Add flour mixture to stabilize consistency. Sprinkle with garlic powder.
Enjoy with your platter of bread, celery, apples and carrots!
Course 2: Entree
Fill fondue pot with 4 cups of chicken broth. Season with garlic powder and seasoned salt. Heat on hi and place raw meats and veggies on individual fondue rods to cook. Potatoes can be placed in the pot for several minutes to cook, until tender. Below are cooking guidelines:
Chicken: 3 minutes or until no longer pink
Beef: 2 minutes or less, depending on preference
Veggies: 3 minutes
Serve with your variety of dipping sauces. Remember to not place any raw meat onto the plate from which you are eating!
Course 3: Dessert Fondue
Fill fondue pot with chocolate chips of choice. Add 1c. heavy cream to the mixture and also 1T. liquor, if desired. You can experiment with tastes for this one. Below are some favorites:
- Yin and Yang: white and dark chocolate
- Peanut Butter: milk chocolate chips and peanut butter chips
- Turtle: milk chocolate, melted caramels and chopped pecans
- White Chocolate Raspberry: white chocolate chips and raspberry liquor (Framboise)
Coffee Punch
Iif you are anything like myself and just l-o-v-e a good cup of coffee, but you are not true coffee-lover material since you love that cup of coffee with all of the good stuff that "hides" the true coffee flavor, as some will say, then this Coffee Punch and its holiday variation are just for you. Yes, it's chilled, but everyone who claims to not like iced coffee always goes crazy over this stuff whenever I make it. Really, it's like a glorified ice cream float, except that the large scoop of ice cream diffuses into the punch. It's perfect for elegant affairs, for outdoor parties in the summertime when you don't want to serve hot coffee, or just as a change to the standard soda and juice punch. Give it a try, you'll love it. Trust me.
This recipe was originally compliments of Southern Living magazine. Enjoy!

Brew coffee the night before you will be serving this and chill overnight black. When you are ready to assemble the punch, pour the coffee into a punch bowl. Add the milk and Nesquik. Stir well until blended. Scoop the entire container of ice cream into the bowl. Finish by squirting the can of whipped cream into the bowl. The recipe calls for the whole can but I usually end up using about 3/4 and then I add some more once the ice cream and whipped cream diffuse, to give the second half of the punch a pick-me-up halfway through the event. Enjoy!
***You can always add Baily's Irish Cream, Rum, Vodka, or Kahlua to the punch, according to your preference in strength, if you would like to serve alcohol at your event.***
***For a delicious Christmas variation, use 1 quart of eggnog instead of the plain whole milk. Sprinkle the whipped cream with nutmeg after filling up the bowl. You may also add rum to the punch (according to your preference in strength) if you would like a spiked punch for a holiday party. Enjoy!***
This recipe was originally compliments of Southern Living magazine. Enjoy!

Coffee Punch
12 cups of brewed and chilled regular or decaffeinated coffee
1 half-gallon container of vanilla ice cream
1 can of Redi-Whip whipped cream
4 cups of whole milk
3/4 cup NesquikBrew coffee the night before you will be serving this and chill overnight black. When you are ready to assemble the punch, pour the coffee into a punch bowl. Add the milk and Nesquik. Stir well until blended. Scoop the entire container of ice cream into the bowl. Finish by squirting the can of whipped cream into the bowl. The recipe calls for the whole can but I usually end up using about 3/4 and then I add some more once the ice cream and whipped cream diffuse, to give the second half of the punch a pick-me-up halfway through the event. Enjoy!
***You can always add Baily's Irish Cream, Rum, Vodka, or Kahlua to the punch, according to your preference in strength, if you would like to serve alcohol at your event.***
***For a delicious Christmas variation, use 1 quart of eggnog instead of the plain whole milk. Sprinkle the whipped cream with nutmeg after filling up the bowl. You may also add rum to the punch (according to your preference in strength) if you would like a spiked punch for a holiday party. Enjoy!***
Wednesday, September 22, 2010
No Canned Pumpkin This Year? No Problem!
 After a summer filled with abundant amounts of yellow squash, cucumbers, tomatoes, eggplant, zucchnini - you name it, we probably got enough of it from our garden to sustain a small village - we have now entered the fall harvest and have this time been blessed with a plethora of pumpkins. Our cup certainly overfloweth as a result of a few small seeds and some water :)
So, I spent last weekend cheerfully cutting down our dried cornstalks for decoration on our porch and creating fall displays of pumpkins in various sizes at the base of my stalks. Oh how lovely and fallish! Bring on the hot apple cider and pumpkin spice lattes. And where are those apples? I want to bob for one!
So here we are, mid-September, a time when I usually have not even taken the kids pumpkin picking yet. And already we have enough pumpkins to carve the entire Duggar family in Jack-o-Lantern form, if we so desire. And let's not forget the smaller, "pie" pumpkin variety that has flourished even more than the carving pumpkins at this point. I have given many away and still our porch is covered with them.
So, as I dig our family out from the Great Pumpkin Invasion, I have decided to invest some time in researching and trying various ways of processing and enjoying fresh pumpkin. I will admit that I am a bit of a pumpkin fanatic. As soon as August hits, I start thinking about how in a month's time, I can again enjoy all of the pumpkin goodies of the fall - pumpkin bread, pumpkin pancakes, pumpkin spice lattes, and, of course, pumpkin pie. So, this research has been quite exciting to me, as I dream of eating fresh pumpkin treats until my pants no longer button. My husband shares in my joy (except I'll take his latte since he would never go near one). But, I did not know how it would go over with the three little people, who act like I have just served them roadkill for dinner most nights. What would they think of that delicious, yet quite strong, taste of pumpkin?
And the verdict? So far, so good. They have gobbled up our pumpkin treats with vigor and have even asked for- brace yourselves - seconds!
So, with the canned pumpkin shortage this year at the supermarket, think about processing your own pumpkin puree and solving that problem without even having to call Libby's to complain! It is really very easy and there is nothing to be afraid of. Got that, ladies? So just give it a try and leave a comment, letting me know how your pumpkin pie and other goodies turned out. I'll bet you one large Jack-o-Lantern that they will be the best pumpkin sweets you have ever eaten!
Pumpkin Puree
What You’ll Need
1—6 to 8 inch “pie” pumpkinA sharp, large serrated knife
A cutting board
An ice cream scoop
A large, covered Pyrex or other oven-safe baker
Directions
1. Find a pie pumpkin., which are smaller, sweeter, less grainy textured pumpkins than the usual jack-o-lantern types. Grocery stores usually carry them in late September through December. They're only about 8 inches in diameter. Look for one that is firm, no bruises or soft spots, and a good orange color. One 6-8 inch pie pumpkin will produce 3-4 cups of pumpkin puree.2. Wash the exterior of the pumpkin in cool or warm water, no soap.
3. Cut the pumpkin in half. A serrated knife and a sawing motion works best - a smooth knife is more likely to slip and hurt you!
4. Scoop out the seeds and scrape the insides. You want to get out that stringy, dangly stuff that coats the inside surface. A heavy ice cream scoop works great for this.
5. Place the two halves of your pumpkin, cut side facing up, into your oven-safe, covered baker and fill with 3 cups of water.
6. Bake, covered, at 350 degrees for approximately 1 hour to 1.5 hours, until the pumpkin is very soft and a knife easily inserts into it.
7. Remove from oven and from baker and let cool. When cool, scrape the puree into a large bowl. It should come out very easily and in large chunks.
8. Place puree into a food processor or blender and puree for several minutes, until smooth. That’s all, you are now ready to use your puree in recipes or freeze it. .
Homemade Pumpkin Pie Recipe
Ingredients
1 homemade or purchased single pastry 9” pie crust (see My Favorite Apple Pie Recipe for a homemade crust)
 1 cup sugar
 1.5 teaspoons ground cinnamon
1 teaspoon ground cloves
1 teaspoon ground allspice
1/2 teaspoon ground ginger
1/2 teaspoon of vanilla extract (optional)
1/2 teaspoon salt
4 large eggs
3 cups pumpkin puree
1.5 cans (12oz each) of evaporated milk 3-4 drops red food coloring to enhance orange color (optional)
1. Preheat the oven to 425 degrees.
2. Mix all of the filling ingredients above with an electric mixer or blender.
3. Pour filling into your pie crust up until about 1/2-1/4” from the top. It will be runny at this point but will firm up in the oven.
4. Bake at 425 degrees for the first 15 minutes; then reduce the oven temperature to 350 and bake another 60 minutes, until a knife inserted into the center comes out dry and clean.
5. Let cool or enjoy warm and serve alone or with ice cream or whipped cream. Enjoy!
Extras?
If you have extra puree after you do your baking, here are a few good ideas to use up the leftovers. Enjoy!
- Use leftover pumpkin pie filling mix to make Pumpkin French Toast for a special breakfast. The eggs, spice and milk are already there so just dip your bread slices in the mixture and put onto your skillet until golden. Happy fall!
- Blend some of your leftover pumpkin puree into a homemade meatloaf, meatballs or mix in with pasta and sauce. Only use about 1/4- 1/2 cup for an entire recipe. The nutrients will be there; the taste will not. The kids love this (since they don't even know what is happening to them !)
- Mix any leftover pumpkin puree into pancake mixture for Pumpkin Pancakes. Use about 1/4-1/2 cup for the single recipe.
- Babies love pureed pumpkin as a quick and easy form of homemade baby food. Or, for older babies and children, mix with some applesauce for a different take on, well, applesauce. Only this one has one of those dreaded veggies in it, but at least it's not green, right? Tell them it's a new type of applesauce and they'll likely try it.
- Freeze it. your fresh puree can be frozen in Ziploc freezer bags or in other plastic containers for future use. If there is some moisture in your puree when you defrost it, just drain that off before using it to avoid having watery baked goods
Don't Forgot Those Seeds!
If you are one of the rare kind like myself and my husband who will actually take the time and effort to remove, clean and roast the pumpkin seeds for a tasty, crunchy snack, then this section is for you. Basically, there is not much difference in how you roast the seeds; the differences lie in how you season them. Enjoy!

To roast pumkin seeds, remove the seeds and place in a colandar. Clean them and remove all pumpkin membrane. Dry and place in a bowl with 1/4-1/3 cup olive oil, depending on how many you are roasting. Seeds from an entire pie pumpkin would probably be 1/4 cup; those from a Jack-o-Lantern would be 1/3 cup. Mix until coated and place in a single layer on a foil-lined cookie sheet with sides. Roast at 350 for 20 minutes or until golden. Remove and promptly season with one or more of the following:
Salt
Cinnamon Sugar
Seasoned Salt
Garlic Powder and Salt
Cayenne Pepper
Tuesday, September 21, 2010
Blasted Little Triangles!
 So, I finally caved in the other night while I was at the supermarket to pick up some salad and whipped cream for my husband's birthday dinner. I had my two purchases and had intentionally not taken a basket for the sole purpose of exiting the store with only those items for which I had made the special trip. But, as I was rounding the corner to the check-out, Romaine in one hand and Cool Whip in the other, I saw them staring at me from the endcap. Their little white tips and brightly colored stripes. Those blasted little triangles that always seem so juvenile, a little too sweet, but irresistable nonetheless. You guessed it- candy corn. And they were just beckoning me to walk over and buy them. I mean it's practically October so date-wise I supoose I wasn't being entirely absurd. And I couldn't come home with just salad, right? (How quickly I am forgetting about the Cool Whip, as if to brainwash myself into thinking that there are no other sweets in my near future...) The kids would like them. Yes, we need them for some upcoming fall baking and I wasn't able to find them after Halloween last year. Must. Buy. Now.
And how convenient that they were located so close to the register anyways, right? Must be destiny.
So, I scrutinized the bags - these were the pre-packaged bulk food variety from Landis, not a commercial brand - and found a reasonably priced bag. And lo and behold I purchased my first fall candy of the season.
So, what does one do with candy corn, other than grab a few out of the candy dish everytime you pass by? Uh, really, there's another use than that?
I have a few ideas that we have done in the past or will likely be trying this year. Happy eatin' and trick-or-treatin'! :)
Candy Corn Bark
I like to give credit where credit is due so this originally came from The Recipe Girl. We in the Martin household like to bake. And often. However, with three young children whose interest in the activity usually lasts about as long as it takes to preheat the oven, we like some fast, fun recipes together....and then some not fast, but still fun, recipes for Mommy to do alone over naptime :)
So candy bark is a favorite here. Peppermint Bark. Jelly Bean Bark. Ah-ha, you say - Candy Corn Bark! I do believe we are on to something here...Oreos, pretzels, white chcolate and candy corn make for a very bright and cheery special treat to celebrate the Halloween season.
1. Break Oreos and pretzels into bite-size pieces and lay on a wax paper-lined cookie sheet with the candy corn.

2. Melt white chocolate wafers; they will melt much better than white chocolate chips but you can use chips and just add a teaspoon of Crisco to thin it out. Pour over the top.

3. Sprinkle with jimmies and chill until set. You should be able to pick up the entire thing at once without it breaking, if it has chilled long enough.


Turkey Cookies
These are so cute that I just want to -gobble, gobble - them all up! My boys and I made these last year for the first time and they were a tremendous hit, both to decorate and to eat. They are incredibly easy and just adorable. Way cuter than the big brown turkey you'll be eating on Thanksgiving.

Ingredients-
Favorite round sugar cookies, either homamde, slice 'n bake or purchased.
Candy corn
Mini M&Ms
Orange decorating icing
Melted chocolate chips
1. When cookies are cool, melt chocolate chips in the microwave at 30 second intervals.
2. To decorate turkey - spread enough chocolate at the top of the cookie to hold 6-7 candy corns as shown; place 2 dots of chocolate for the eyes and stick mini M&Ms on; use another dot of chocolate for eye pupils; use the orange icing to draw feet and a beak, as shown.
3. Let dry completely and enjoy!
Candy Corn Decorating
Candy corn is so thick and dense that it is also a good candidate for dressing up the house for Halloween. If you have any you can spare, that is. I know we do not do anything scary for Halloween in our house, partly because of the kids being so young and mainly because I just find gory Halloween decor just, well, creepy. There's just something about a bloodshot eyeball floating in a vase that doesn't quite scream "decorative" to me :). But, to me, candy corn are an adorable way of bringing some Halloween festivity to your home without the gore or the cost of buying pre-made tchotchkes.
1. (Simplest) Fill up some different glass jars with candy corn and place around for decoration or as centerpieces for a party.

3. (Simple) Make a candy corn wreath. Originally from kidswonderart.com.

ingredients -
10 inch foam wreath
3-4 bags of candy corn
Hot glue gun
Toothpicks
Halloween foamies (optional)
Mod Podge or spray sealer
#1. Make sure all of the candy corn are basically the same size.
#2. Dab a bit of hot glue to the styrofoam and place one piece of candy corn on it. Continue the process placing each piece of candy corn in opposite directions. Try to work in straight rows covering the entire form. You can make a second layer which will cover any spaces. You'll need to be careful moving the wreath.
#3. For the finishing take the wreath outdoors and spray the wreath with a sealer. Leave outside until dry. This will also help to keep the candy corn stabilized on the form.
#4. Attach the Halloween foamie shapes to a toothpick and place them at random into the wreath. Then add the ribbon. This is optional. Your wreath is ready to be displayed indoors
Saturday, September 18, 2010
My Favorite Apple Pie
 Our family went apple picking today and came home with 20 lbs. of Honey Crisp apples. So, thoughts of homemade applesauce are on my mind for tomorrow, when I have more energy after today's outing. But what I did know was that I wanted to use up the last 6 Gala apples I had bought at our local supermarket a few days ago. Clean out the "old" and bring in the new! And what better way to use up apples when I know we will be eating dinner at home on a Saturday night? Homemade apple pie, of course :)
Below is my absolute favorite apple pie recipe, and we have tried many of them before. It uses a shortening crust for flakiness and is a crumb-topped pie instead of a double pastry crust. Enjoy!
Crust
1-1/4c. all-purpose flour
1 tsp. salt
1/3c. plus 1T. shortening
5T. ice cold water
Filling
6 apples, cored, peeled and sliced
2T. lemon juice
2/3c. white sugar
1 pinch ground cloves1tsp. allspice
1tsp. cinnamon
3T. cornstarch
Topping
1/3c. brown sugar
1/2c. all-purpose flour
1tsp. cinnamon
5T butter, softened
Preheat oven to 375 degrees.
Mix the 1-1/4c. flour and 1tsp. salt for the crust together. Cut in the shortening with a pastry blender. Add the ice water and stir with a fork until the dough basically sticks together into a ball. Be careful not to knead your dough too much; this will make it heavy and tough! Place dough on a pie mat and roll to 12" circle. Lay over top of a pie plate and gently press into the dish. Trim excess dough to the edge of the plate and roll the rest over to form a lip. Press edges with a fork or make a decorative edge on your crust, however desired.
Place all of the filling ingredients into a bowl and mix well. Fill uncooked pie crust with filling.
Mix all topping ingredients until coarse crumbs form. Sprinkle on top of the filling.
Bake at 375 degrees for 50-60 minutes. Serve warm with ice cream or whipped cream, if desired.
Friday, September 17, 2010
Skillet Lemon Chicken
This is one of our favorite recipes. It's fast and easy for a quick week-night meal and is also nice enough that it can be 'dressed up' for company. It was originally a Good Housekeeping recipe and is especially yummy when served over pasta or rice. Enjoy!
 Skillet Lemon Chicken
 Skillet Lemon Chicken
 4 medium skinless, boneless chicken breast halves
2T. plus 1-1/2 tsp. flour
1/2tsp. salt
1 large egg
2 tsp. olive oil
2T. butter
3 garlic cloves, minced
1/2 lemon, thinly sliced
1/2c. chicken broth
1/2c. dry white wine
2T. fresh lemon juice
2T. drained capers
1T. chopped fresh parsley
Between 2 sheets of plastic wrap, with meat mallet or rolling pin, pound chicken breasts to flatten slightly. On waxed paper, mix 2T. flour with salt. In a pie plate, with fork, beat egg. Coat chicken with flour mixture, then egg.
In 12-inch skillet, heat olive oil over medium-high heat until hot. Stir in 1T. butter until melted. Add chicken; cook 5 minutes. Reduce heat to medium; turn chicken and cook about 8-10 more minutes, until juices run clear. Tranfer chicken to a warm plate.
Add garlic and lemon slices to drippings in skillet; cook until golden, sauteeing constantly. In cup, mix chicken broth, wine, lemon juice and 1-1/2tsp. flour until smooth; stir into skillet mixture. heat sauce to boiling; boil 1 minute. Stir in capers and remaining 1T. butter until butter melts. Arrange lemon slices over and between the chicken breasts. Pour sauce over chicken. Sprinkle with chopped parsley.
Makes 4 main-dish servings.
Subscribe to:
Posts (Atom)